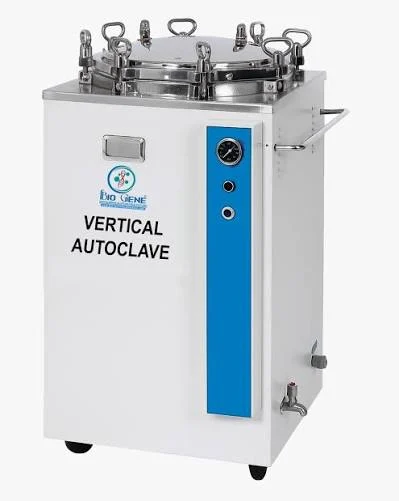
A Vertical Autoclave SOP establishes a standardized procedure for the safe and effective operation, cleaning, calibration, and maintenance of a vertical autoclave used in pharmaceutical microbiology laboratories. Proper autoclave operation is essential for sterilization, decontamination, and maintaining microbiological control in laboratory environments.
This Standard Operating Procedure (SOP) covers general operating precautions, equipment startup, recipe selection, sterilization cycle monitoring, Vacuum Leak Test (VLT), Bowie-Dick testing, alarm acknowledgement, cleaning practices, calibration, and preventive maintenance.
It also describes the responsibilities of microbiology, engineering, and quality assurance personnel in ensuring proper equipment operation and documentation in accordance with approved procedures and validated parameters.
Note: The operating parameters and procedures described in this SOP must be verified against the approved equipment-specific SOP and validation documents before implementation.
SOP
1. PURPOSE:
To establish the procedure for the operation, cleaning, calibration, and maintenance of the
vertical autoclave.
2. SCOPE:
This SOP applies to the operation, cleaning, calibration, and maintenance of the vertical
autoclave.
3. RESPONSIBILITY / ACCOUNTABILITY:
3.1 The Microbiologist shall be responsible for operating the equipment and compiling the
data generated by the equipment’s dedicated printer.
3.2 The Microbiology Reviewer shall be responsible for reviewing the records and
autoclave printouts.
3.3 The Engineering personnel shall be responsible for calibration and preventive
maintenance of the autoclave and for ensuring the availability of required utilities,
including purified water for steam generation, potable water for the vacuum pump,
compressed air, and electrical power supply.
3.4 The Head of Department (HOD) or designee shall be responsible for reviewing and
ensuring the implementation of this SOP.
3.5 The Head of Quality Assurance (QA) or designee shall be responsible for approving this
SOP and overseeing its implementation and procedural compliance.
4. ABBREVIATIONS:
SOP: Standard Operating Procedure
QA: Quality Assurance
MB: Microbiology
SS: Stainless Steel
VLT: Vacuum Leak Test
HPHV: High Pressure High Vacuum
5. DEFINITION:
Autoclave: An autoclave is a device that uses pressurized steam to destroy microorganisms,
including bacteria, fungi, and bacterial spores, as well as other biological agents.
Vacuum Leak Test: A test performed to assess the airtight integrity of the pre-vacuum autoclave
chamber and its associated piping system.
Bowie-Dick Test: A test performed in an autoclave to evaluate effective air removal and steam
penetration and to detect air leaks or inadequate air removal.
6. PROCEDURE:
6.1 General precautions:
6.1.1 Verify that all required utilities, including purified water for steam generation, potable
water for the vacuum pump, and compressed air, are available in the required quantities
before initiating the autoclave cycle.
6.1.2 Ensure that the dot matrix printer is properly connected to the autoclave and has an
adequate supply of paper before starting the operation.
6.1.3 Verify that the equipment is clean and suitable for use before operation.
6.1.4 Do not operate the autoclave if any of the required utilities are unavailable or insufficient.
6.1.5 Maintain a safe distance from the autoclave while the equipment is switched on and in
operation.
6.1.6 Always wear heat-resistant gloves when loading or unloading materials from the
autoclave or handling autoclaved materials.
6.1.7 Open the autoclave door only after completion of the cycle and confirmation that the
chamber pressure has reached 0 kg/cm².
6.1.8 Avoid touching hot surfaces of the autoclave with bare hands to prevent burns.
6.2 Operation of Autoclave:
6.2.1 Switch on the three-phase mains power supply, followed by the UPS supply.
6.2.2 Rotate the ‘CONTROL ON’ knob clockwise to switch on the controller. The home
screen will appear on the controller display, as shown in Figure 01.
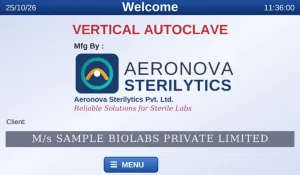
Fig 01
6.2.3 Rotate the ‘HEATER ON’ knob on the controller clockwise to switch on the heater and
enable pressure generation in the chamber. Wait until the jacket pressure gauge indicates
1.5 kg/cm², as shown in Figure 02.
Note: Keep the heater switched ‘OFF’ while performing the Vacuum Leak Test.
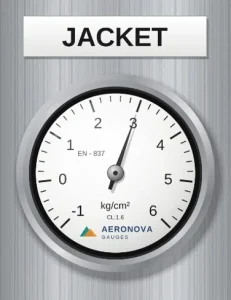
Fig 02
6.2.4 Once the jacket pressure reaches the required level of 1.5 kg/cm², the ‘HEATER ON’
indicator will stop glowing, even though the knob remains in the ‘ON’ position.
6.2.5 Place the materials to be autoclaved into the stainless-steel (SS) baskets inside the
autoclave chamber.
6.2.6 Close the autoclave door by sliding the door handle to the right until the chamber is
completely closed, and hold it in position. Rotate the gasket (GSK) knob on the
controller towards the ‘1 Pressuring’ position (left side) to lock the autoclave door.
6.2.7 Tap the ‘MENU’ icon on the controller’s home screen to display the menu screen, as
illustrated in Figure 03.
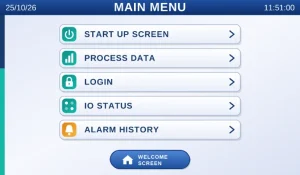
Fig 03
6.2.8 Select the ‘Login’ icon on the ‘MAIN MENU’ screen to display the login screen, as
shown in Figure 04.

Fig 04
6.2.9 Press the ‘LOGIN/LOGOUT’ icon and feed the ‘Operator Name and Password’, as
shown in Fig 05.
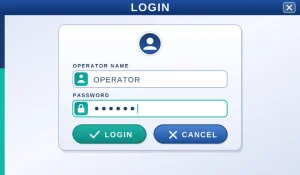
Fig 05
6.2.10 The operator’s name shall correspond to an authorized Operator, Supervisor, or
Administrator.
6.2.11 After entering the login credentials, select ‘OK’ to return to the ‘MAIN MENU’ screen,
as shown in Figure 03.
6.2.12 Select the ‘START UP SCREEN’ option from the ‘MAIN MENU’ to display the screen
shown in Figure 06.
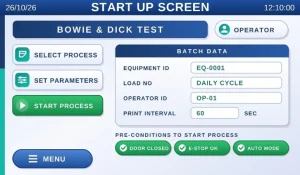
Fig 06
6.2.13 Manually enter the ‘Load No.’ in the ‘Batch Data’ section. Assign a unique load
number to each autoclave load using the format ‘YY-XXX’, as described below.
Where:
* YY: Last two digits of the year.
* XXX: Sequential serial number of the load.
For example, the first autoclave load of the year 2025 shall be numbered 25-001,
irrespective of the recipe type. The second load shall be numbered 25-002, and
subsequent loads shall be numbered sequentially.
6.2.14 Select ‘SELECT PROCESS’ to choose the required recipe from the available options:
Vacuum Leak Test, Bowie & Dick Test, Standard Process – Media, Standard Process –
Decontamination, or HPHV Process-1. Press ‘SELECT PROCESS’ repeatedly until the
desired recipe is displayed.
Note: Before initiating the cycle, verify that all three precondition indicators Door
Precondition, Emergency Stop Released, and Auto Mode are displayed in green, as
shown in Figure 06.
6.2.15 The ‘SET PARAMETERS’ displayed in Figure 06 shall be configured in accordance
with the approved validation data. Refer to Annexure I for the specified parameters
applicable to each recipe type.
6.2.16 Select the ‘START PROCESS’ icon to initiate the autoclave cycle.
6.2.17 The printer shall print the initial cycle details, including the company name, equipment
name, batch data, date and time, and recipe name.
6.2.18 Verify that all details specified in Section 6.2.17 of the generated printout are accurate
and correspond to the intended autoclave cycle.
6.2.19 The autoclave cycle shall commence according to the selected recipe (Vacuum Leak
Test, Bowie-Dick Test, Standard Process – Media, Standard Process –Decontamination,
or HPHV Process-1) and its defined set parameters. Refer to Figure 07 for the controller
display during the progression of the autoclave cycle.
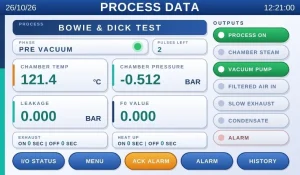
Fig 07
6.2.20 The printer shall record the time, temperature (°C), pressure, autoclave cycle status, and
F₀ value at 60-second intervals throughout the cycle.
6.2.21 Upon completion of the autoclave cycle, the controller display shall indicate ‘PROCESS
END’, as shown in Figure 08.
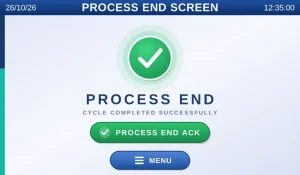
Fig 08
6.2.22 Select the ‘PROCESS END ACK’ icon to acknowledge the completion of the autoclave
cycle.
6.2.23 Rotate the ‘HEATER ON’ knob on the controller anticlockwise to switch off the heater.
Note: Open the autoclave door only after the cycle is complete and the chamber pressure
has reached 0 kg/cm².
6.2.24 Rotate the gasket (GSK) knob on the controller towards the ‘2 Retract’ position (right
side) to unlock the autoclave door.
6.2.25 Open the autoclave door by sliding the door handle to the left until the chamber is fully
open.
6.2.26 Remove the materials from the stainless-steel (SS) baskets using heat-resistant gloves.
6.2.27 Remove the autoclave cycle printout from the printer upon completion of the cycle.
6.2.28 Verify the autoclave cycle printout for the temperature, holding time, successful cycle
completion, and F₀ value, and acknowledge the verification as per the applicable
procedure.
6.2.29 Record the required details in the autoclave usage logbook in accordance with Annexure
II.
6.3 Alarm acknowledgement:
6.3.1 If an alarm occurs during autoclave operation, acknowledge it by selecting the ‘ACK
ALARM’ icon on the controller display, as shown in Figure 07.
6.3.2 Inform the Section In-charge and Engineering Department to initiate the necessary
corrective actions.
6.4 Vacuum Leak Test:
6.4.1 Frequency: Perform the test daily before initiating any autoclave load.
6.4.2 Ensure that the ‘HEATER ON’ switch remains in the ‘OFF’ position throughout the
procedure.
6.4.3 Perform the test with the autoclave chamber empty.
6.4.4 Set Parameters: Refer to Annexure I for the specified parameters.
6.5 Bowie & Dick Test:
6.5.1 Frequency: Perform the test once every month (± 5 days).
6.5.2 Load the autoclave chamber with the Bowie-Dick test pack before performing the test.
6.5.3 Set Parameters: Refer to Annexure I for the specified parameters.
6.6 Standard Process – Media
6.6.1 Frequency: Perform the test as required, following successful completion of the Vacuum
Leak Test (VLT) for the day.
6.6.2 Load the autoclave chamber with the media intended for sterilization.
6.6.3 Set Parameters: Refer to Annexure I for the specified parameters.
6.7 Standard Process – Decontamination
6.7.1 Frequency: Perform the cycle as required, after successful completion of the Vacuum
Leak Test (VLT) for the day.
6.7.2 Load the autoclave chamber with the media intended for decontamination.
6.7.3 Set Parameters: Refer to Annexure I for the specified parameters.
6.8 HPHV Process – 1
6.8.1 Frequency: Perform the cycle as required, following successful completion of the
Vacuum Leak Test (VLT) for the day.
6.8.2 Load the autoclave chamber with the accessories intended for sterilization.
6.8.3 Set Parameters: Refer to Annexure I for the specified parameters.
6.9 Cleaning of autoclave:
6.9.1 Daily Cleaning: Wipe the external surfaces of the autoclave using 70% IPA.
6.9.2 Weekly Cleaning: Clean the inner chamber of the autoclave and the stainless-steel (SS)
baskets by scrubbing with a soap solution, followed by rinsing with purified water.
6.9.3 After each decontamination cycle, open the ‘SG Drain’ to flush out any residual media
from the outlet drain pipe. Ensure that the autoclave is switched OFF and the jacket
pressure is maintained at 1.0 kg/cm² during this procedure to facilitate effective
cleaning.
Note: After completing a decontamination cycle, run an empty sterilization cycle before
using the autoclave to sterilize media or accessories.
6.10 Calibration:
6.10.1 Perform periodic calibration of the autoclave temperature sensor(s) and pressure gauges
in accordance with Engineering ‘Procedure for Calibration Management’.
6.11 Maintenance of autoclave:
6.11.1 Perform preventive maintenance of the autoclave in accordance with the Engineering
procedure titled ‘Preventive Maintenance Management’.
7. ANNEXURES:
Annexure – I: Set Parameters for Different Recipes of the Vertical Autoclave
Annexure – II: Template for the Usage Record of the Vertical Autoclave
Annexure – III: Photographic Illustrations of Validated Load Patterns
8. REFERENCES:
NIL
9. REVISION HISTORY:
Revision No. Effective date Reason for revision
00 New SOP
END OF DOCUMENT